


LCD Backgorund
Frequently, an 8051 program must interact with the outside world using input and output devices that communicate directly with a human being. One of the most common devices attached to an 8051 is an LCD display. Some of the most common LCDs connected to the 8051 are 16x2 and 20x2 displays. This means 16 characters per line by 2 lines and 20 characters per line by 2 lines, respectively.
Fortunately, a very popular standard exists which allows us to communicate with the vast majority of LCDs regardless of their manufacturer. The standard is referred to as HD44780U, which refers to the controller chip which receives data from an external source (in this case, the 8051) and communicates directly with the LCD.
The 44780 standard requires 3 control lines as well as either 4 or 8 I/O lines for the data bus. The user may select whether the LCD is to operate with a 4-bit data bus or an 8-bit data bus. If a 4-bit data bus is used the LCD will require a total of 7 data lines (3 control lines plus the 4 lines for the data bus). If an 8-bit data bus is used the LCD will require a total of 11 data lines (3 control lines plus the 8 lines for the data bus).
The three control lines are referred to as EN, RS, and RW.
The EN line is called "Enable." This control line is used to tell the LCD that you are sending it data. To send data to the LCD, your program should make sure this line is low (0) and then set the other two control lines and/or put data on the data bus. When the other lines are completely ready, bring EN high (1) and wait for the minimum amount of time required by the LCD datasheet (this varies from LCD to LCD), and end by bringing it low (0) again.
The RS line is the "Register Select" line. When RS is low (0), the data is to be treated as a command or special instruction (such as clear screen, position cursor, etc.). When RS is high (1), the data being sent is text data which sould be displayed on the screen. For example, to display the letter "T" on the screen you would set RS high.
The RW line is the "Read/Write" control line. When RW is low (0), the information on the data bus is being written to the LCD. When RW is high (1), the program is effectively querying (or reading) the LCD. Only one instruction ("Get LCD status") is a read command. All others are write commands--so RW will almost always be low.
Finally, the data bus consists of 4 or 8 lines (depending on the mode of operation selected by the user). In the case of an 8-bit data bus, the lines are referred to as DB0, DB1, DB2, DB3, DB4, DB5, DB6, and DB7.
AN EXAMPLE HARDWARE CONFIGURATION
As we've mentioned, the LCD requires either 8 or 11 I/O lines to communicate with. For the sake of this tutorial, we are going to use an 8-bit data bus--so we'll be using 11 of the 8051's I/O pins to interface with the LCD.
Let's draw a sample psuedo-schematic of how the LCD will be connected to the 8051.
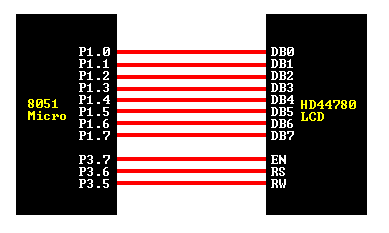
As you can see, we've established a 1-to-1 relation between a pin on the 8051 and a line on the 44780 LCD. Thus as we write our assembly program to access the LCD, we are going to equate constants to the 8051 ports so that we can refer to the lines by their 44780 name as opposed to P0.1, P0.2, etc. Let's go ahead and write our initial equates:
-
DB0 EQU P1.0
DB1 EQU P1.1
DB2 EQU P1.2
DB3 EQU P1.3
DB4 EQU P1.4
DB5 EQU P1.5
DB6 EQU P1.6
DB7 EQU P1.7
EN EQU P3.7
RS EQU P3.6
RW EQU P3.5
DATA EQU P1
-
SETB RW
As we mentioned above, the EN line is used to tell the LCD that you are ready for it to execute an instruction that you've prepared on the data bus and on the other control lines. Note that the EN line must be raised/lowered before/after each instruction sent to the LCD regardless of whether that instruction is read or write, text or instruction. In short, you must always manipulate EN when communicating with the LCD. EN is the LCD's way of knowing that you are talking to it. If you don't raise/lower EN, the LCD doesn't know you're talking to it on the other lines.
Thus, before we interact in any way with the LCD we will always bring the EN line low with the following instruction:
-
CLR EN
-
SETB EN
The instruction is executed by the LCD at the moment the EN line is brought low with a final CLR EN instruction.
-
Programming Tip:
The LCD interprets and executes our command at the instant the EN line is
brought low. If you never bring EN low, your instruction will never be
executed. Additionally, when you bring EN low and the LCD executes your
instruction, it requires a certain amount of time to execute the command. The
time it requires to execute an instruction depends on the instruction and the
speed of the crystal which is attached to the 44780's oscillator input.
CHECKING THE BUSY STATUS OF THE LCD
As previously mentioned, it takes a certain amount of time for each instruction
to be executed by the LCD. The delay varies depending on the frequency of the
crystal attached to the oscillator input of the 44780 as well as the instruction
which is being executed.
While it is possible to write code that waits for a specific amount of time
to allow the LCD to execute instructions, this method of "waiting" is not
very flexible. If the crystal frequency is changed, the software will need to
be modified. Additionally, if the LCD itself is changed for another LCD
which, although 44780 compatible, requires more time to perform its operations,
the program will not work until it is properly modified.
A more robust method of programming is to use the "Get LCD Status" command to
determine whether the LCD is still busy executing the last instruction received.
The "Get LCD Status" command will return to us two tidbits of information; the
information that is useful to us right now is found in DB7. In summary, when
we issue the "Get LCD Status" command the LCD will immediately raise DB7 if
it's still busy executing a command or lower DB7 to indicate that the LCD is
no longer occupied. Thus our program can query the LCD until DB7 goes low,
indicating the LCD is no longer busy. At that point we are free to continue and
send the next command.
Since we will use this code every time we send an instruction to the LCD, it is
useful to make it a subroutine. Let's write the code:
Programming Tip:
The above routine does the job of waiting for the LCD, but were it to be used
in a real application a very definite improvement would need to be made: as
written, if the LCD never becomes "not busy" the program will effectively
"hang," waiting for DB7 to go low. If this never happens, the program will
freeze. Of course, this should never happen and won't happen when
the hardware is working properly. But in a real application it would be wise
to put some kind of time limit on the delay--for example, a maximum of 256
attempts to wait for the busy signal to go low. This would guarantee that even
if the LCD hardware fails, the program would not lock up.
WAIT_LCD:
Thus, our standard practice will be to send an instruction to the LCD and then
call our WAIT_LCD routine to wait until the instruction is completely
executed by the LCD. This will assure that our program gives the LCD the time
it needs to execute instructions and also makes our program compatible with any
LCD, regardless of how fast or slow it is.
CLR EN ;Start LCD command
CLR RS ;It's a command
SETB RW ;It's a read command
MOV DATA,#0FFh ;Set all pins to FF initially
SETB EN ;Clock out command to LCD
MOV A,DATA ;Read the return value
JB ACC.7,WAIT_LCD ;If bit 7 high, LCD still busy
CLR EN ;Finish the command
CLR RW ;Turn off RW for future commands
RET
Before you may really use the LCD, you must initialize and configure it. This is accomplished by sending a number of initialization instructions to the LCD.
The first instruction we send must tell the LCD whether we'll be communicating with it with an 8-bit or 4-bit data bus. We also select a 5x8 dot character font. These two options are selected by sending the command 38h to the LCD as a command. As you will recall from the last section, we mentioned that the RS line must be low if we are sending a command to the LCD. Thus, to send this 38h command to the LCD we must execute the following 8051 instructions:
-
CLR RS
MOV DATA,#38h
SETB EN
CLR EN
LCALL WAIT_LCD
Programming Tip: The LCD command 38h is really the sum of a number of option bits. The instruction itself is the instruction 20h ("Function set"). However, to this we add the values 10h to indicate an 8-bit data bus plus 08h to indicate that the display is a two-line display.
We've now sent the first byte of the initialization sequence. The second byte of the initialization sequence is the instruction 0Eh. Thus we must repeat the initialization code from above, but now with the instruction. Thus the the next code segment is:
-
CLR RS
MOV DATA,#0Eh
SETB EN
CLR EN
LCALL WAIT_LCD
Programming Tip: The command 0Eh is really the instruction 08h plus 04h to turn the LCD on. To that an additional 02h is added in order to turn the cursor on.
The last byte we need to send is used to configure additional operational parameters of the LCD. We must send the value 06h.
-
CLR RS
MOV DATA,#06h
SETB EN
CLR EN
LCALL WAIT_LCD
Programming Tip: The command 06h is really the instruction 04h plus 02h to configure the LCD such that every time we send it a character, the cursor position automatically moves to the right.
So, in all, our initialization code is as follows:
-
INIT_LCD:
-
CLR RS
MOV DATA,#38h
SETB EN
CLR EN
LCALL WAIT_LCD
CLR RS
MOV DATA,#0Eh
SETB EN
CLR EN
LCALL WAIT_LCD
CLR RS
MOV DATA,#06h
SETB EN
CLR EN
LCALL WAIT_LCD
RET
When the LCD is first initialized, the screen should automatically be cleared by the 44780 controller. However, it's always a good idea to do things yourself so that you can be completely sure that the display is the way you want it. Thus, it's not a bad idea to clear the screen as the very first opreation after the LCD has been initialiezd.
An LCD command exists to accomplish this function. Not suprisingly, it is the command 01h. Since clearing the screen is a function we very likely will wish to call more than once, it's a good idea to make it a subroutine:
CLEAR_LCD:
How that we've written a "Clear Screen" routine, we may clear the LCD at any
time by simply executing an LCALL CLEAR_LCD.
CLR RS
MOV DATA,#01h
SETB EN
CLR EN
LCALL WAIT_LCD
RET
Programming Tip: Executing the "Clear Screen" instruction on the LCD also positions the cursor in the upper left-hand corner as we would expect.
WRITING TEXT TO THE LCDNow we get to the real meat of what we're trying to do: All this effort is really so we can display text on the LCD. Really, we're pretty much done.
Once again, writing text to the LCD is something we'll almost certainly want to do over and over--so let's make it a subroutine.
WRITE_TEXT:
The WRITE_TEXT routine that we just wrote will send the character in the
accumulator to the LCD which will, in turn, display it. Thus to display text
on the LCD all we need to do is load the accumulator with the byte to display
and make a call to this routine. Pretty easy, huh?
SETB RS
MOV DATA,A
SETB EN
CLR EN
LCALL WAIT_LCD
RET
Now that we have all the component subroutines written, writing the classic "Hello World" program--which displays the text "Hello World" on the LCD is a relatively trivial matter. Consider:
LCALL INIT_LCD
The above "Hello World" program should, when executed, initialize the LCD, clear
the LCD screen, and display "Hello World" in the upper left-hand corner of the
display.
LCALL CLEAR_LCD
MOV A,#'H'
LCALL WRITE_TEXT
MOV A,#'E'
LCALL WRITE_TEXT
MOV A,#'L'
LCALL WRITE_TEXT
MOV A,#'L'
LCALL WRITE_TEXT
MOV A,#'O'
LCALL WRITE_TEXT
MOV A,#' '
LCALL WRITE_TEXT
MOV A,#'W'
LCALL WRITE_TEXT
MOV A,#'O'
LCALL WRITE_TEXT
MOV A,#'R'
LCALL WRITE_TEXT
MOV A,#'L'
LCALL WRITE_TEXT
MOV A,#'D'
LCALL WRITE_TEXT
The above "Hello World" program is simplistic in the sense that it prints its text in the upper left-hand corner of the screen. However, what if we wanted to display the word "Hello" in the upper left-hand corner but wanted to display the word "World" on the second line at the tenth character? This sounds simple--and actually, it is simple. However, it requires a little more understanding of the design of the LCD.
The 44780 contains a certain amount of memory which is assigned to the display. All the text we write to the 44780 is stored in this memory, and the 44780 subsequently reads this memory to display the text on the LCD itself. This memory can be represented with the following "memory map":

Thus, the first character in the upper left-hanad corner is at address 00h. The following character position (character #2 on the first line) is address 01h, etc. This continues until we reach the 16th character of the first line which is at address 0Fh.
However, the first character of line 2, as shown in the memory map, is at address 40h. This means if we write a character to the last position of the first line and then write a second character, the second character will not appear on the second line. That is because the second character will effectively be written to address 10h--but the second line begins at address 40h.
Thus we need to send a command to the LCD that tells it to position the cursor on the second line. The "Set Cursor Position" instruction is 80h. To this we must add the address of the location where we wish to position the cursor. In our example, we said we wanted to display "World" on the second line on the tenth character position.
Referring again to the memory map, we see that the tenth character position of the second line is address 4Ah. Thus, before writing the word "World" to the LCD, we must send a "Set Cursor Position" instruction--the value of this command will be 80h (the instruction code to position the cursor) plus the address 4Ah. 80h + 4Ah = CAh. Thus sending the command CAh to the LCD will position the cursor on the second line at the tenth character position:
-
CLR RS
MOV DATA,#0CAh
SETB EN
CLR EN
LCALL WAIT_LCD
LCALL INIT_LCD
SUMMARY
LCALL CLEAR_LCD
MOV A,#'H'
LCALL WRITE_TEXT
MOV A,#'E'
LCALL WRITE_TEXT
MOV A,#'L'
LCALL WRITE_TEXT
MOV A,#'L'
LCALL WRITE_TEXT
MOV A,#'O'
LCALL WRITE_TEXT
CLR RS
MOV DATA,#0CAh
SETB EN
CLR EN
LCALL WAIT_LCD
MOV A,#'W'
LCALL WRITE_TEXT
MOV A,#'O'
LCALL WRITE_TEXT
MOV A,#'R'
LCALL WRITE_TEXT
MOV A,#'L'
LCALL WRITE_TEXT
MOV A,#'D'
LCALL WRITE_TEXT
This tutorial has presented the underlying concepts of programming an LCD display. Obviously it has not addresses all issues. The 44780 LCD controller offers many other functions which are accessed using other commands, and some of the commands already presented include other options that were not discussed here. However, this tutorial should get you going in the right direction.
| Previous: Tutorial Contents | Tutorial Contents | Next: 4-bit LCD Programming |